Building your own computer can be an incredibly rewarding experience. Whether you’re a first-time builder or looking to upgrade an old machine, assembling a PC from individual components gives you more control over performance, design, and cost.
This detailed step-by-step guide will walk you through everything you need to know to build a working PC—from preparation to powering it on for the first time.
What You’ll Need Before You Start
Essential Components:
- CPU (Processor)
- Motherboard
- RAM (Memory)
- Storage (SSD or HDD)
- Graphics Card (if needed)
- Power Supply Unit (PSU)
- Case
- CPU Cooler (air or liquid)
- Monitor, keyboard, and mouse
Tools:
- Phillips #2 screwdriver (magnetic tip is helpful)
- Anti-static wrist strap (optional but recommended)
- Thermal paste (only if not pre-applied)
- Zip ties or Velcro straps (for cable management)
Also, make sure you have a clean, flat workspace with good lighting.
Step 1: Ground Yourself
Before touching any sensitive electronics, discharge static electricity from your body by touching a grounded metal object—or wear an anti-static wrist strap. Static discharge can damage components.
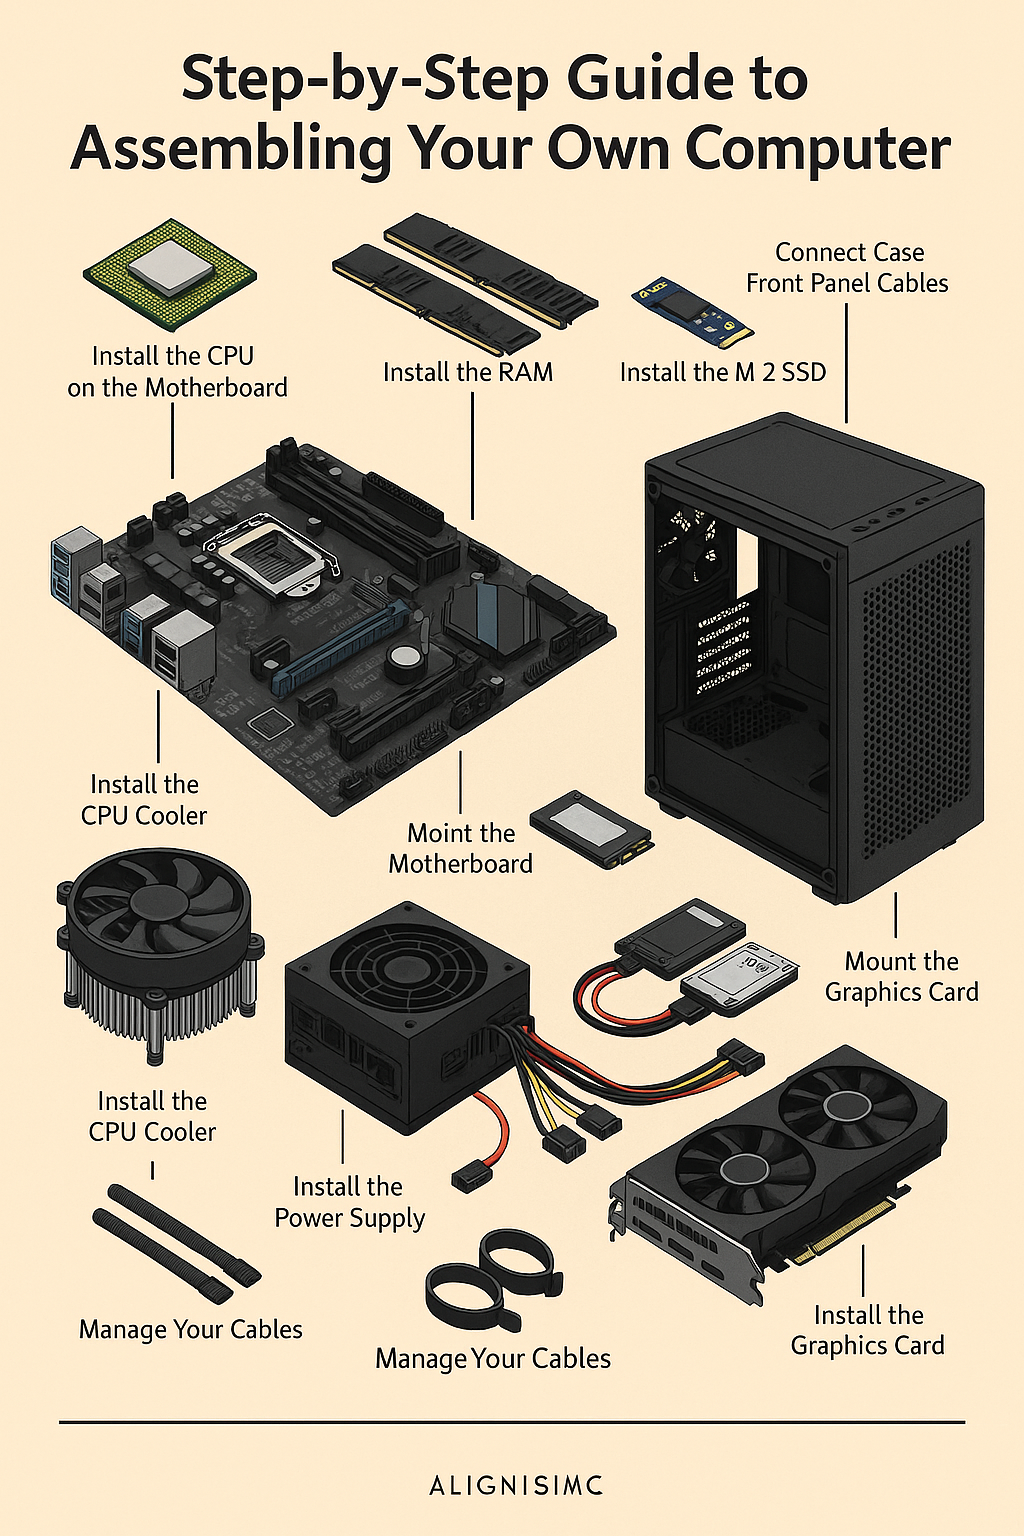
Step 2: Install the CPU on the Motherboard
- Unbox your motherboard and place it on its anti-static bag or box.
- Open the CPU socket latch.
- Align the CPU correctly with the socket—look for the golden triangle on the CPU and match it with the triangle on the socket.
- Gently lower the CPU into place. Don’t force it!
- Close the retention arm to secure it.
⚠️ Tip: Avoid touching the pins on the CPU or the socket.
Step 3: Install the RAM
- Find the RAM slots on the motherboard.
- Check the notch on the RAM module—it only fits one way.
- Insert each module into the appropriate slot (usually 2nd and 4th if you’re using 2 sticks).
- Push down firmly until both side latches click into place.
Step 4: Install the M.2 SSD (if applicable)
- Locate the M.2 slot on the motherboard.
- Insert the SSD at a 30-degree angle.
- Gently push it down and secure it with a screw.
If using a SATA SSD or HDD, you’ll install it later when everything is inside the case.
Step 5: Prepare the Case
- Remove both side panels of your case.
- If not already installed, insert motherboard standoffs in the correct positions based on the form factor (ATX, mATX, etc.).
- Check the rear I/O shield—it usually comes with the motherboard. Snap it into the back of the case.
Step 6: Mount the Motherboard
- Carefully lower the motherboard into the case.
- Align it with the standoffs and rear I/O shield.
- Use the provided screws to secure the motherboard—do not overtighten.
Step 7: Install the CPU Cooler
If your cooler is air-based:
- Apply a pea-sized dot of thermal paste to the center of the CPU (skip if pre-applied).
- Attach the cooler according to its manual—most have mounting brackets.
- Connect the cooler’s fan header to the CPU fan connector on the motherboard.
If it’s an AIO liquid cooler, install the radiator and fans first, then attach the pump to the CPU.
Step 8: Install the Power Supply (PSU)
- Insert the PSU into its bay (usually bottom rear of the case).
- Secure it with screws.
- If it’s modular, plug in only the cables you’ll use:
- 24-pin ATX (motherboard)
- 8-pin CPU (EPS)
- PCIe cables for GPU
- SATA power for drives
Step 9: Install the Graphics Card (GPU)
- Remove the appropriate PCIe slot covers on the back of the case.
- Insert the GPU into the top PCIe x16 slot.
- Secure the GPU to the case with screws.
- Connect the PCIe power cables from the PSU.
Step 10: Connect Case Front Panel Cables
These are usually small and delicate—consult your motherboard manual for the exact layout.
Typical connections include:
- Power switch
- Reset switch
- Power LED
- HDD LED
- Front USB
- Front audio
Use tweezers or patience for the small header pins!
Step 11: Install SATA Storage (if applicable)
- Mount the SSD or HDD in its bracket or drive bay.
- Connect SATA data cable to the motherboard.
- Connect SATA power cable from the PSU.
Step 12: Manage Your Cables
Use zip ties or Velcro to neatly route your cables behind the case’s side panel. This improves airflow and makes your build look cleaner.
Focus on:
- CPU and GPU power cables
- Front panel connectors
- Fan and RGB cables
Step 13: Double Check Everything
Before powering on:
- Are all power cables connected?
- Are the RAM and GPU fully seated?
- Are CPU cooler and fans plugged in?
- Is nothing loose or rattling?
Double-check connections using your motherboard and PSU manuals.
Step 14: Power On for the First Time
- Connect your monitor, keyboard, and mouse.
- Plug in the power cable and flip the PSU switch to ON.
- Press the power button on the case.
If all goes well:
- Fans will spin.
- Lights may turn on.
- Your monitor should show the BIOS/UEFI screen.
If not, don’t panic—check power cables, RAM, and GPU seating first.
Step 15: Enter BIOS/UEFI
Press DEL, F2, or the key shown on-screen to enter BIOS.
Inside BIOS, you can:
- Confirm your system recognizes the CPU, RAM, GPU, and storage.
- Set the boot priority to your installation media (USB or DVD).
- Enable features like XMP for RAM or adjust fan curves.
Step 16: Install the Operating System
- Create a bootable USB drive with Windows, Linux, or your OS of choice.
- Plug it in and restart the PC.
- Follow on-screen instructions to install the OS.
Once installed, install drivers for your motherboard, GPU, and other peripherals.
Final Thoughts: Congratulations, You Built a PC!
Building your own computer isn’t just about saving money—it’s a valuable learning experience that gives you full control over your system’s performance, maintenance, and future upgrades.
Final Tips:
- Keep all component boxes and receipts.
- Regularly clean your PC for better cooling and longevity.
- Don’t be afraid to upgrade later (RAM, storage, GPU, etc.).
- Enjoy the system you built—whether for gaming, work, or content creation.